The Model Game: Beating the Benoni
The most important part of opening preparation is understanding the middlegame that follows. In this new column, opening expert Christof Sielecki will explain the strategic ideas and characteristic pawn structures of a particular opening. He begins with a Benoni structure in a ‘grandmaster versus master’ game.
by Christof Sielecki
*** This column appeared in New In Chess magazine 2024#1. Please let us know what you think of this new column. ***
Welcome to the new column ‘The Model Game’. It will feature instructive games that demonstrate key ideas in common pawn structures, often associated with a particular opening line. Knowing these structures and being able to assess the pros and cons is a key skill of stronger players.
You’ll often hear statements like ‘Now I have an excellent Sicilian Dragon!’, when the game started completely differently, but still a Sicilian formation ensued. The first game I have a look at was played between grandmaster Ori Kobo and international master Rokas Klabis at the European Club Cup 2023 in Albania. A deceptively modest opening turned out to be very effective for White.
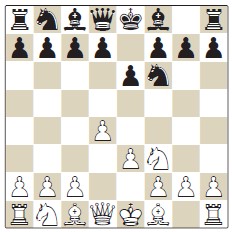
Ori Kobo (2551) - Rokas Klabis (2419)
Durres EU-Cup 2023
Benoni structure E14
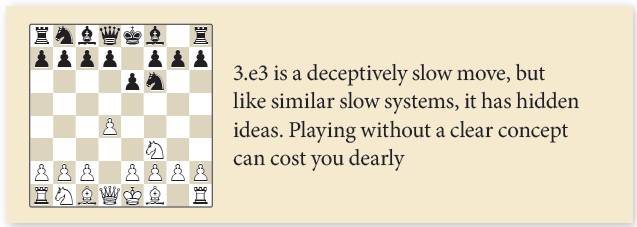
1.d4 ♘f6 2.♘f3 e6 3.e3
Opening setups involving an early e3 by White have become fashionable in recent years. Two popular examples are 1.♘f3 d5 2.e3, Vincent Keymer’s pet line, and 1.d4 ♘f6 2.c4 g6 3.♘f3 ♗g7 4.e3, a way for White to avoid main-line Grünfeld territory. These approaches, similar to the line employed in our game, are theoretically less explored and often lead to less forcing positions with fewer early trades.
3...b6
Black’s second move already hinted at his intention to avoid ...d5-based structures. Going for a queenside fianchetto is the other way to fight for control of the central light squares, particularly the square e4. Klabis’ main repertoire consists of the Nimzo- and Bogo-Indian (1.d4 ♘f6 2.c4 e6 3.♘c3 and 3.♘f3 ♗b4+), but he doesn’t usually play setups involving an early ...d5. It looks like he always aims for a non-symmetrical structure to create some tension.
4.♗d3 ♗b7 5.0-0
White has completed his kingside development first and keeps some flexibility regarding the queenside. It’s still possible to play c4 and ♘c3 quickly (as in the game), or opt for a queenside fianchetto instead.
5...♗e7
Black again avoids committing to a central pawn formation. I prefer the classical 5...d5, staking a claim in the centre. It makes sense to play the pawn move now, as it leaves more flexibility for the pieces. Black could develop the bishop to d6, for example. An additional idea is answering 6.c4 by 6...dxc4 7.♗xc4 a6, playing for ...b5 and ...c5 in the spirit of the Queen’s Gambit Accepted.
6.c4
White’s intention is clear. He wants to play ♘c3 and e4 next, building a perfect centre.
6...c5
Black sticks with his risky strategy of avoiding ...d5. He should go for 6...d5 or 6...0-0 7.♘c3 d5 to stop White’s central pawn expansion. The most likely continuation is 8.cxd5 exd5 9.b3, with approximately equal chances. These positions often lead to interesting play, as White may opt for a later ♘e5 / f4 plan to start an attack.
7.♘c3
By now Black’s path to equality has become narrow.
7...d6?
A huge mistake – Black probably overlooked or misjudged White’s powerful reply. Black’s best bet is 7...cxd4 8.exd4 d5, when 9.cxd5 ♘xd5 10.♘e5 is pleasant for White, but Black is objectively OK.
Still, there are many dangerous ideas to navigate. I witnessed the following rapid game live: 10...0-0 11.♕h5 ♘f6 12.♕h4 ♘c6? (12...♘bd7 is best and OK for Black) 13.♗g5 g6 14.♗a6! ♘xe5 15.dxe5
and Black resigned in Hans Ree-Jeroen Piket, Breda 2001.
What about 7...0-0 ? This move is also punished by 8.d5!, when 8...exd5 9.cxd5 ♘xd5 (9...d6 10.e4 leads to our main game) 10.♘xd5 ♗xd5 11.♗xh7+ ♔xh7 12.♕xd5.
White has a substantial advantage. Black suffers from weaknesses on the d-file and a permanently shaky king position due to the missing h-pawn.
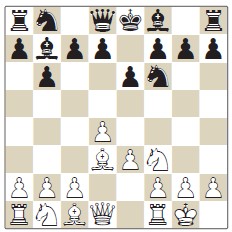
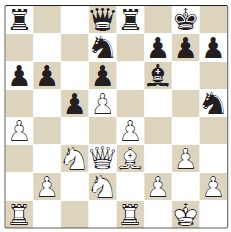
8.d5!
Very powerful! Black can’t play 8...exd5 9.cxd5 ♘xd5?? due to 10.♗b5+, winning a piece. White therefore establishes a large central space advantage, as the d-pawn stays on the board permanently. This is terrible news for Black’s b7-bishop, of course. We’ll have a deeper look at the pawn structure in a moment.
8...exd5
This looks like the best try. Even worse is 8...e5, when Stockfish suggests the instructive line 9.♘d2! 0-0 10.f4 ♘bd7 11.g4!, which looks fantastic for White. A more schematic continuation would be 9.e4?!, but it would delay White’s kingside attack considerably.
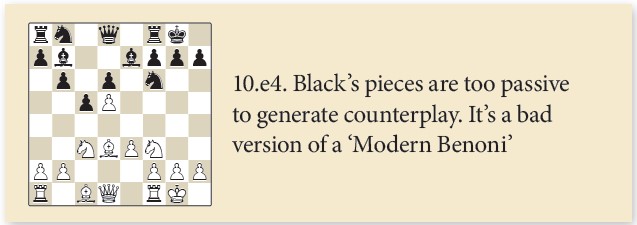
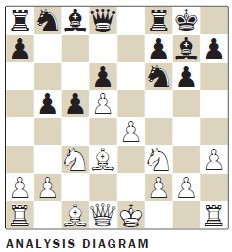
9.cxd5 0-0 10.e4
White has a large advantage – let’s discuss why. It’s all about space and controlling the centre. White has established pawns on d5 and e4, severely restricting Black’s pieces, with the bishops in particular making a sad impression. On top of everything, White has a ready-made plan to go for: breaking through in the centre with e4-e5, possibly prepared by going f2-f4 first.
On the other hand, it’s entirely unclear how Black should pursue active ideas. A possible idea is utilizing the queenside pawns (...a6 and ...b5), but White can easily stop this advance with the automatic reply a4, as seen later in the game.
So is it correct to conclude that this pawn structure heavily favours White in general? No, because we need to consider static (pawn structure) and dynamic factors (pawn breaks and piece activity). Black needs dynamic ‘compensation’ for the static defects of his structure.
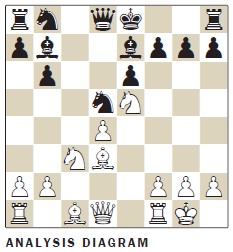
One main line of the Modern Benoni, whose pawn structure we are discussing, shows an instructive example. After 1.d4 ♘f6 2.c4 c5 3.d5 e6 4.♘c3 exd5 5.cxd5 d6 6.e4 g6 7.♘f3 ♗g7 8.h3 (stopping ...♗g4) 8...0-0 9.♗d3 Black’s best move is 9...b5!,
based on tactical ideas like 10.♗xb5 ♘xe4! 11.♘xe4 ♕a5+, regaining the sacrificed piece. Black needs to act quickly and use the dynamic potential of the g7-bishop and his queenside pawns.
Let’s compare with our current game position. Black’s bishop is stuck on e7 – ouch! Black has played ...b6 and ...♗b7, which doesn’t help, either. Black has no active, dynamic ideas... so what to do? He goes for the best plan: trading pieces.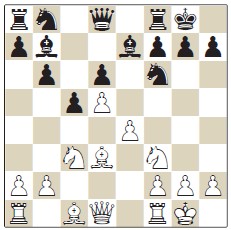
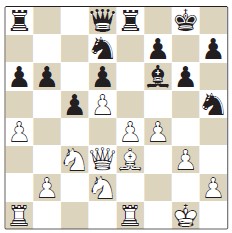
10...♗a6
A key problem for Black is the lack of space for his pieces. If Black manages to trade ALL minor pieces, things would look much brighter. You could even imagine two black rooks pointing at the e4-pawn in such a scenario. This dream scenario is tough to accomplish, though. Black manages to trade the light-squared bishop, but it’s not easy to get rid of more pieces.
11.♖e1 ♗xd3 12.♕xd3 ♘bd7
13.♗f4
A natural spot for the bishop, putting some pressure on d6. I also like preparing this idea with 13.h3, so that ...♘h5 can be met by ♗h2.
13...♘h5 14.♗e3 a6 15.a4
An automatic move, stopping ...b5. It also prepares the knight tour to c4, an ideal spot for this piece.
15...♖e8
16.g3
Ori Kobo probably wanted to avoid 16.♘d2 ♗g5, but he would still be substantially better after 17.♘c4 ♗xe3 18.♖xe3. Black has made some progress by trading the bishops, but is still under pressure.
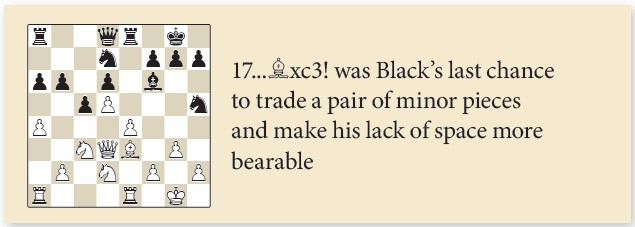
16...♗f6 17.♘d2
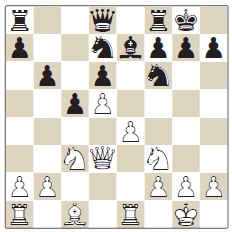
17...g6?
It’s a tough decision, but I think the engine is correct in suggesting to go for 17...♗xc3! to trade a pair of minor pieces. Yes, the bishop ‘looks strong’ on the long diagonal, but it’s very hard to find good spots for the knights with the bishop still on the board. We’ll witness this scenario in the game... and it’s not pretty for Black!
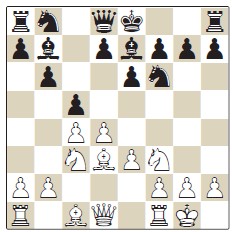
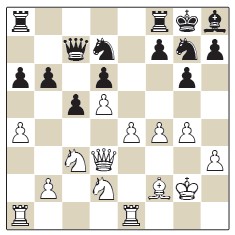
18.f4
A dream position! White controls e5 and has plenty of time to thoroughly prepare the central breakthrough e4-e5.
18...♗h8
Klabis has ...♘g7 and ...f5 in mind, but you clearly see that three minor pieces are too many for Black’s cramped position.
19.♔g2
Kobo prepares the coming kingside expansion.
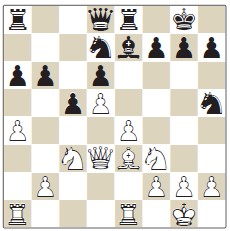
19...♕c7 20.h3 ♘g7 21.g4 ♖f8 22.♗f2
On the way to g3 to connect with the crucial e5-square.
22...♕b7
Black can’t play 22...f5 due to 23.gxf5 gxf5 24.♔h1, when the open g-file will be deadly for the king.
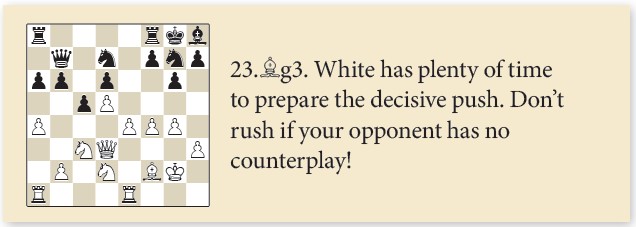
23.♗g3 ♖fd8
Black is condemned to sit and wait. 23...f5 24.♘c4 only helps White.
24.♘c4 ♘e8 25.e5
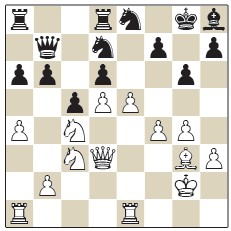
The Benoni player’s worst nightmare! The conversion is an easy job, as Black has no counterplay at all.
25...♘f8 26.♕f3 b5 27.♘a5 ♕c7 28.axb5 axb5 29.♘c6 b4 30.♘e4 dxe5 31.♖xa8 ♖xa8 32.fxe5 ♘e6 33.dxe6 fxe6 34.♖f1
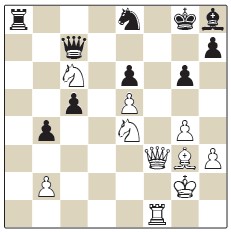
Black resigned. ■
Flashcards